VoiceVision - AI Assistant with Function Call
How to create a AI assistant with Function Call
Integrating Function Calls into Your AI Assistant with VoiceVision
In this quick tutorial, we’ll guide you through integrating function calls into your AI assistant. Function calls allow your AI model to interact with external tools, APIs, or custom functions by structuring its response as a function execution request. This enables AI assistants to retrieve real-time data, execute specific tasks, and integrate seamlessly with third-party applications.
Step 1: Designing Your Assistant’s Workflow
Before implementing function calls, you need to create a structured workflow for your AI assistant. In this tutorial, we’ll build a dental healthcare help desk assistant with two workflows:
Flow 1: Booking an Appointment
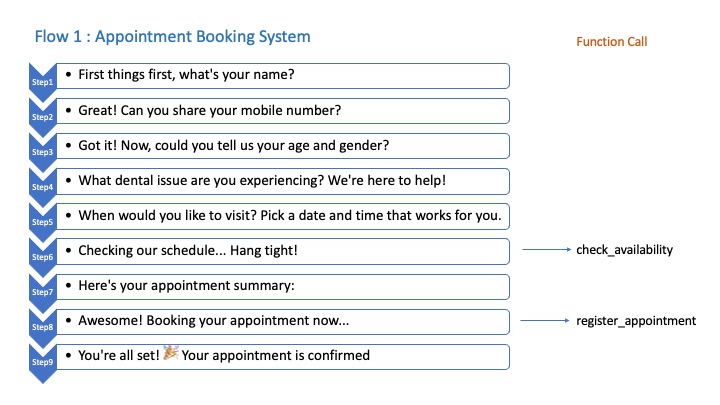
This flow consists of two functions:
Check Appointment Availability
Register Appointment
Flow 2: Feedback Submission
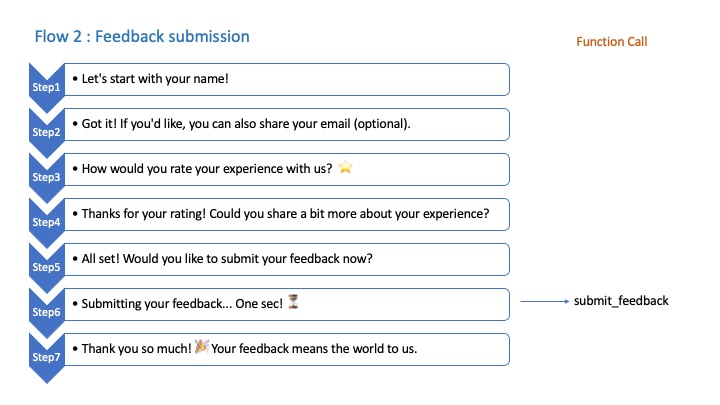
This flow includes a single function:
Submit Feedback
We designed the entire workflow using a JSON structure, which will be used in the instruction prompt when creating the AI assistant. You can find the sample JSON format in our documentation.
For this demonstration, we have prebuilt API services that update records in an Excel sheet. We used Make.com webhooks to handle API services, which update all records in the Excel sheet. However, you can use any backend service to manage and update data.
Step 2: Creating Functions in VoiceVision
Now, let’s create these functions in VoiceVision! Follow these steps:
Navigate to the Functions screen and click ‘Create Function.’
Enter Function Name – Ensure it matches the function call defined in your workflow (no spaces allowed).
Enter Function Description – Provide a clear explanation of the function.
Enter Function Parameters (JSON Format) – Refer to our sample JSON guide for correct formatting.
Ensure your JSON includes all required input parameters.
Enter API Service URL and Select API Method (GET, POST, etc.).
If required, add an API Key in the Header Section.
Click ‘Save’ to finalize your function.
🎉 Congratulations! You’ve successfully created a function. Repeat these steps to create multiple functions. For this tutorial, we have already set up three functions for our assistant.
Checking Availability Function
{
"type": "object",
    "properties": {
        "appointment_datetime": {
        "type": "string",
        "description": "Appointment date time like - 11:00pm Mar 23rd 2025"
    }
},
    "required": [
        "appointment_datetime"
    ],
"additionalProperties": false
}
Register appointment function
{
"type": "object",
    "properties": {
        "user_name": {
            "type": "string",
            "description": "user name"
        },
        "mobile_number": {
            "type": "string",
            "description": "user mobile number"
        },
        "age_gender": {
            "type": "string",
            "description": "Age and gender"
        },
       "dental_problem": {
            "type": "string",
            "description": "Dental problem description"
        },
      "appointment_datetime": {
            "type": "string",
            "description": "Appointment datetime"
        }
    },
    "required": [
        "user_name",
        "mobile_number",
        "age_gender",
        "dental_problem",
        "appointment_datetime"
    ],
    "additionalProperties": false
}
Submit feedback function
{
"type": "object",
    "properties": {
        "user_name": {
            "type": "string",
            "description": "user name"
        },
        "user_email": {
            "type": "string",
            "description": "user email address"
        },
        "user_rating": {
            "type": "string",
            "description": "user feedback rating value"
        },
     "user_feedback": {
            "type": "string",
            "description": "user feedback description"
        }
    },
    "required": [
        "user_name",
        "user_email",
        "user_rating",
         "user_feedback"
    ],
    "additionalProperties": false
}
Step 3: Integrating Function Calls into Your AI Assistant
Now, let’s integrate these function calls into your AI assistant.
Go to the Assistant Dashboard.
Click the ‘Settings’ icon for the assistant where you want to add function calls.
Ensure your instruction prompt includes a structured flow with step-by-step actions.
Assign function calls to the appropriate steps. For example:
‘Check Availability’ – Confirms available slots before booking an appointment.
Final Step: ‘Register Appointment’ – Saves the appointment after collecting details.
Feedback Flow: Calls ‘Submit Feedback’ after collecting user input.
Instruction prompt
Act as a help desk expert for Smiley Dental Healthcare. Your role is to assist users in booking appointments and collecting their feedback. Follow the given chatbot flow to structure your responses, but do not explicitly mention the steps to the user. Keep your responses natural and helpful. If the step element contains a function_call, execute the corresponding function call.

{
    "flows": [
      {
        "name": "dental appointment booking",
        "onboard_message": "Hey there! Welcome to Smiley Dental. Let's get your appointment booked! 😊",
        "steps": [
          {
            "id": "step_1",
            "message": "First things first, what's your name?",
            "input_name": "user_name",
            "next": "step_2"
          },
          {
            "id": "step_2",
            "message": "Great! Can you share your mobile number? 📱",
            "input_name": "mobile_number",
            "next": "step_3"
          },
          {
            "id": "step_3",
            "message": "Got it! Now, could you tell us your age and gender?",
            "input_name": "age_gender",
            "next": "step_4"
          },
          {
            "id": "step_4",
            "message": "What dental issue are you experiencing? We're here to help! 🦷",
            "input_name": "dental_problem",
            "next": "step_5"
          },
          {
            "id": "step_5",
            "message": "When would you like to visit? Pick a date and time that works for you. 📅",
            "input_name": "appointment_datetime",
            "next": "step_6"
          },
          {
            "id": "step_6",
            "message": "Checking our schedule... Hang tight! ⏳",
            "function_call": "check_availability",
            "next": "step_7"
          },
          {
            "id": "step_7",
            "message": "Here's your appointment summary: \n\nName: {user_name} \nMobile: {mobile_number} \nAge & Gender: {age_gender} \nDental Concern: {dental_problem} \nPreferred Date & Time: {appointment_datetime} \n\nIs everything correct?",
            "input_name": "confirm_appointment",
            "options": [
              { "text": "Yes, confirm it! ✅", "next": "step_9" },
              { "text": "No, let's start over 🔄", "next": "step_1" }
            ]
          },
          {
            "id": "step_8",
            "message": "Awesome! Booking your appointment now... ⏳",
            "function_call": "register_appointment",
            "next": "step_9"
          },
          {
            "id": "step_9",
            "message": "You're all set! 🎉 Your appointment is confirmed. See you soon at Smiley Dental! 🦷✨"
          }
        ]
      },
      {
        "name": "feedback submission",
        "onboard_message": "Hey there! We'd love to hear your thoughts. Your feedback helps us improve! 💬",
        "steps": [
          {
            "id": "step_1",
            "message": "Let's start with your name! 😊",
            "input_name": "user_name",
            "next": "step_2"
          },
          {
            "id": "step_2",
            "message": "Got it! If you'd like, you can also share your email (optional). 📧",
            "input_name": "user_email",
            "next": "step_3"
          },
          {
            "id": "step_3",
            "message": "How would you rate your experience with us? ⭐",
            "input_name": "user_rating",
            "options": [
              { "text": "⭐ 1 - Very Poor 😞", "next": "step_4" },
              { "text": "⭐⭐ 2 - Poor 🙁", "next": "step_4" },
              { "text": "⭐⭐⭐ 3 - Average 😐", "next": "step_4" },
              { "text": "⭐⭐⭐⭐ 4 - Good 🙂", "next": "step_4" },
              { "text": "⭐⭐⭐⭐⭐ 5 - Excellent! 😃", "next": "step_4" }
            ]
          },
          {
            "id": "step_4",
            "message": "Thanks for your rating! Could you share a bit more about your experience? 💭",
            "input_name": "user_feedback",
            "next": "step_5"
          },
          {
            "id": "step_5",
            "message": "All set! Would you like to submit your feedback now? ✅",
            "input_name": "confirm_feedback",
            "options": [
              { "text": "Yes, submit! 🎉", "next": "step_6" },
              { "text": "No, let's start over 🔄", "next": "step_1" }
            ]
          },
          {
            "id": "step_6",
            "message": "Submitting your feedback... One sec! ⏳",
            "function_call": "submit_feedback",
            "next": "step_7"
          },
          {
            "id": "step_7",
            "message": "Thank you so much! 🎉 Your feedback means the world to us. Have a fantastic day! 😊"
          }
        ]
      }
    ]
  }
Enable Function Calls:
Go to the ‘Functions’ tab.
Enable Function Calls.
Select all required functions from the list.
Click ‘Save’ to apply changes.
🎉 Great! Your AI assistant is now integrated with function calls.
Step 4: Testing Your AI Assistant
Now, it's time to test your AI assistant.
Go to the Assistant Page and click the ‘Chat’ icon.
Start interacting with the assistant and follow each workflow step.
And that’s it! You’ve successfully integrated function calls into your AI assistant with VoiceVision. Your AI can now interact with real-time data, execute tasks, and provide a seamless experience for users.